


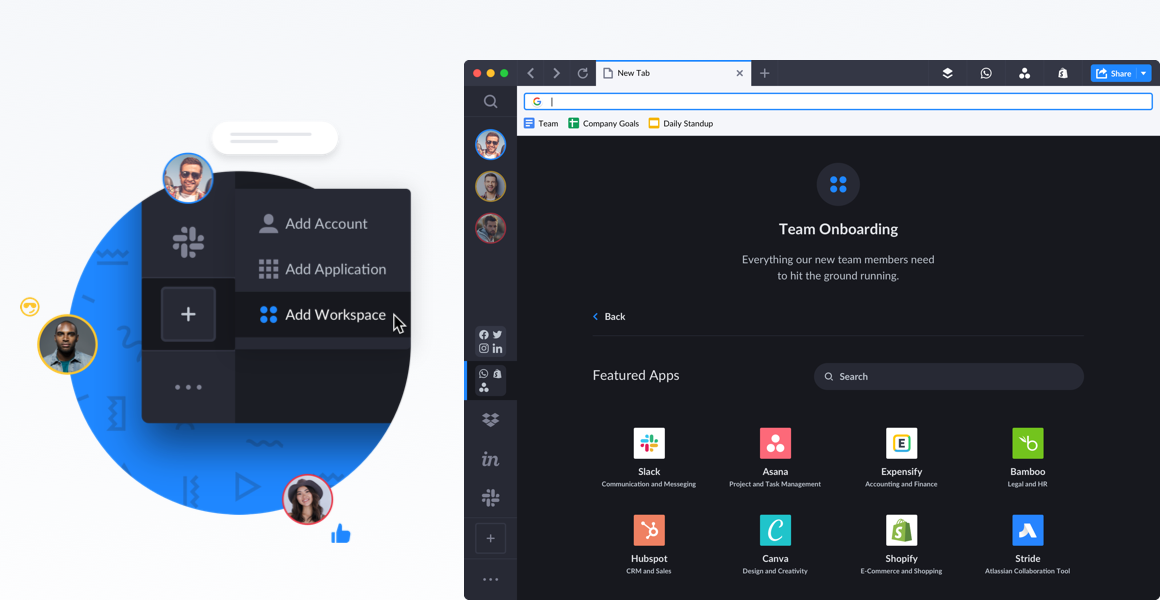
Workspaces are a focused collection of apps, tabs, and bookmarks for you to mix and match any way you choose.
To get started creating your first Workspace, click the square ‘+’ button in the sidebar and choose ‘Add Workspace.’ Give it a name, then connect your apps, bookmark pages, and add tabs for quick reference.
The best part? Workspaces are shareable! Below we've added a few tips and tricks to make the most of them.
1. Keep meetings flowing
Add mission-critical tabs and bookmarks that have all the information everyone will need for a meeting. Whether it’s for the whole company, the marketing team, or maybe just a 1:1, Workspaces are a quick way to collect and share important apps, tabs and bookmarks that you will want to reference together. Tabs are highly flexible and can be added and removed quickly. Bookmarks are great for information you want to be highly visible, and therefore easily accessible. Apps will typically form the core of your Workspace.
- Tabs are added by clicking on the ‘+’ icon on the top bar of a Workspace.

- Bookmarks are added by clicking on the ‘☆’ icon on the top right in the search bar of a tab.

Running meetings remotely is even more difficult than in-person. If you share your screen, then it’s hard to actually see everyone else in the meeting. That’s why it’s so helpful to be able to access a Workspace while on a Zoom call together. You can navigate through the same apps, documents, and tabs together. Zoom or Skype can be added directly to the Workspace for a meeting. Keeping meeting minutes in either a tab or an app within a Workspace makes it easier for everyone to access them, anytime.
2. Create Workspaces for each client or project
This will keep logins, ideas, and information separate and organized.
- Don’t forget to add a title to each Workspace so it’s easy to see what the purpose of a Workspace is at-a-glance. You can do this by clicking where it says ‘Untitled Workspace.’

If you manage multiple social media accounts for multiple clients, for example, you can create a Workspace for each client so you won’t have to log in and out or search through the sidebar for the right account.
You can also keep projects organized by creating a workspace for each one. That way, everything, including brainstorming notes, tasks, design, and development tickets are all together in one place so no one loses any key information.
3. Choose apps thoughtfully
Only add the most critical apps to each Workspace -- you know, the ones your team needs to streamline that specific workflow and prevent distractions (ie we don’t recommend adding your Facebook app to your Finance Workspace). A cluttered Workspace just makes it harder to get work done so choose the apps that you or your team actually needs carefully. One method is to choose just one app per category for a few key categories:
- Text communication (Slack, Twist)
- Video communication (Zoom, Google Meet, Skype)
- Project management (Asana, ClickUp, Trello)
- File sharing and storage (Box, Dropbox, OneDrive)
- One more mission critical app. This depends on the purpose of the Workspace but some options for different types of teams or projects:
Choosing 5 core apps will keep your Workspace streamlined and easy to use. Sometimes, you won’t be able to choose just 5 apps. But, always ask yourself if an app is mission-critical, and if not, consider leaving it out of your Workspace to reduce distractions and clutter. If you don’t need to have social media, news, or entertainment apps in a Workspace, it’s better for you or your team’s productivity to leave those out.
- To add a new app to a Workspace, either navigate back to the homepage of the Workspace or open a new tab. Then, click on the ‘Add Application’ button to add a new app. You can set an app homepage by right-clicking on an app icon and clicking ‘Save page as app home.’

4. Invite the right people to your Workspace
Sharing a Workspace automatically sends an email to whoever you shared it with. If you share a Workspace with a team member who doesn’t use Shift, they will receive an invite to sign up for Shift, a free 7-day trial of Shift Advanced and have full access to the shared Workspace, forever.
All your team members will have to do, if they don’t use Shift, is to create an account with either an Outlook, Gmail, or Microsoft 365 account in order to access a shared Workspace.
5. Think about who needs view, editing or admin access
Think about how much control you want each person to have within a Workspace, when sharing a Workspace. There are multiple different levels of access available to users which gives you plenty of flexibility when deciding who to share a Workspace with. The three different access levels are:
- View access means that users can only view the Workspace. At this level, users cannot add or remove bookmarks, tabs, and apps.
- Edit access means that users can add or remove bookmarks, tabs, and apps.
- Admin access means that users can delete the Workspace.
When sharing a Workspace, everyone you are sharing with in a particular batch of emails must have the same level of access. Ie: you need to share ‘View,’ ‘Edit,’ and ‘Admin’ levels of access in three separate batches.
Ready to get started?
Hopefully these tips have given you some more ideas on how to use Workspaces and get the most out of every project, meeting, and task. Whether you are working in-office or remotely, or working on your own or as part of a team, Workspaces can help you streamline your workstation and keep all of your mission-critical information in one place.
If you have any other questions about Workspaces then check out our Knowledge Base full of ‘How-To’ articles.


 Share on Facebook
 Share on Twitter


